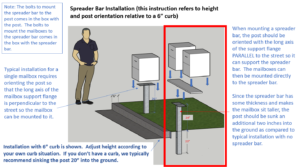
Installation
MailCase In-Ground Post Installation
Watch the following video for detailed instructions on installing the MailCase on an In-Ground Post.
The following hardware comes included with the In-Ground Post:
- Four (4) mounting bolts, washers, and nuts to mount the mailbox to the post.
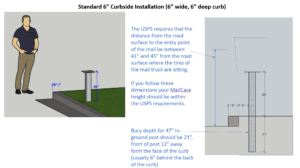
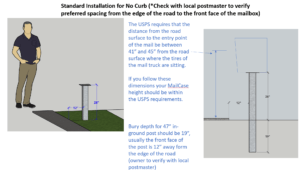
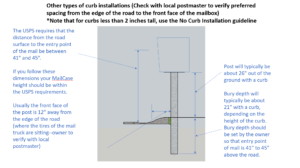
CUSTOMERS ARE REQUIRED TO CONTACT THE LOCAL POST OFFICE BEFORE INSTALLING THE MAILBOX TO ENSURE ITS CORRECT PALCEMENT AND HEIGHT AT THE STREET. GENERALLY, MAILBOXES ARE INSTALLED AT A HEIGHT OF 41-45 INCHES FROM THE ROAD SURFACE TO THE POINT OF MAIL ENTRY. LOCKING MAILBOXES ARE TYPICALLY SET BACK 6-8 INCHES FROM THE FACE OF THE CURB OR EDGE OF THE ROADWAY TO THE FACE OF THE MAILBOX.
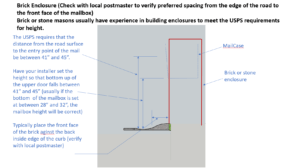
Are you installing the MailCase inside a masonry Enclosure?
- Do not bolt the flag onto the mailbox inside a masonry enclosure.
- Use a qualified contractor to install your mailbox in a masonry enclosure.
For all other installations, mount the flag onto the mailbox on the front right corner using the provided bolts.
For installations not using a MailCase brand surface mount or in-ground post, use a qualified contractor to install the mailbox on a wood or metal post that you already have. NOTE: MailCase does not recommend this option since we consider a wood post a security risk. It would take less than 30 seconds for a criminal to cut through a wooden post with a cordless skill saw or sawsall.
MailCase Surface-Mount Post Installation
Included with your Surface Mount Post are the following:
- Four (4) 5/16″ X 1 & 1/4″ lag shields with a 1/2″ outer diameter
- Four (4) 5’16” X 2″ lag bolts
- Eight (8) 5/16″ washers
You’ll need a hammer drill with a 1/2″ bit. These can be rented at hardware stores or equipment rental stores – often by the hour. You don’t need a large hammer drill, but you do need to make sure it accommodates a 1/2″ bit. We recommend taking one of the lag shields with you to the equipment rental store so you can hold it up and compare it to the bit to make sure the bit is the right diameter.
Put the post where you want it, and then mark the 4 holes you need to drill with a pencil. When you drill the holes for the lag shields, be careful not to drill the holes too deep. You want to drill the holes so that the top of the lag shield is flush with the surface of the concrete. Even a small hammer drill can drill holes in concrete pretty fast, so it is best to drill a little and check the depth, and drill a little more.
When all four holes are drilled, put the lag shields in each hole and then put the post in place. Put a washer over each of the lag bolts and then put the bolts through the holes in the post flange and into the lag shields. You’ll be able to start twisting the bolts by hand, but you’ll need a wrench to tighten them all the way in. Call us if you have any questions about Surface Mount Post Installation.
With the Surface-Mount Post we also include four mounting bolts, washers, and nuts to mount the mailbox to the post.
